Default Settings
- Get Started
- Troubleshooting and FAQ
- Release Notes
- Patient Channel
- Triggers
- Technical Specifications
- Patient Facesheet
- Insights & Analytics
- Conversation Flows
- Campaigns
- SMS Basics
- Inbox
- Lines & Resources Requests
- Lines, Events, Resources
- Referrals
- AI Agents
- Add-Ons
- Users and Groups
- Platform Settings and Configuration
- Self-Rescheduling
- Recalls
- Artera Harmony Federal Edition
- Marketplace
Table of Contents
High Volume Phone Number Customize Secure Message Actions to Reopen Patient ChannelReopen Patient Channel when SMS Delivery FailsSync Patient Communication PreferencesAllow Enterprise Users to Modify Communication Preference to "Do Not Contact"Notify when Text Message is UndeliverableEmail CommunicationDisplay Portal Enrollment Status on Patient FacesheetReferral Statuses to Display on FacesheetPatient Appointment Status OptionsAllow Patients to Modify Appointment StatusDisplay Map of Appointment Location to PatientsShow All Patient AppointmentsCustomize {eventConfirmText} Smart PhraseAutomatic Logout due to InactivityMultifactor Authentication (MFA)Staff Password ExpirationEnterprise-Wide Patient Search and MessagePatient Sign-in Security CriteriaCustomize Email LogoArtera has two settings menus that allow you to configure your Practices and Enterprise to fit your needs. Enterprise Users can access the following:
- Practice Settings: These are located within the Practice Settings menu and only apply to the Practice indicated at the top of the "Practice" drop-down menu. Manager Users can also access Practice Settings. Click here to review Practice Settings.
- Default Settings: These are located within the Enterprise Settings menu and apply to all Practices. These settings are covered below.
Accessing Default Settings
-
Select Settings in the lower-left corner of the navigation bar.

-
From the Enterprise Settings menu, choose Default Settings.

Default Setting Explanations
High Volume Phone Number
This toll-free phone number can be used for Campaign outreach in efforts to prevent patients' phone carriers from deciphering messages as spam.
NOTE: The phone number below is an example phone number and is not the phone number used across Enterprises. 
Customize Secure Message
Customize the notification text for Secure Messages. We recommend using the {clientFirstNameProperCase} Smart Phrase to help recipients identify which patient the message is for. This is especially helpful for family members (like a parent and child) who share the same phone number. You can also add translations to support patient language preferences.
Actions to Reopen Patient Channel
Choose which appointment responses will re-open the Patient Channel.
NOTE: This can also be set at the Practice-level using Practice Settings.

- For customers who do not send the appointment status from Artera to their EMR, we recommend choosing at least Confirmed and Cancelled from the drop-down. This ensures that the staff working the "All Messages" view can update the schedule in the EMR with the patient response.
- For customers who send the appointment status from Artera to their EMR, we recommend leaving this setting set to "none". Since the appointment is automatically updated in the EMR based on the patient's response in Artera, there is no reason to alert staff of any appointment status updates.
- If your integration does not accept Reschedule Appointment as a status, we recommend including it as an option to open the Patient Channel.
Reopen Patient Channel when SMS Delivery Fails
Enable this setting to mark the Patient Channel as "open" if a text message fails to deliver to the patient. The Patient Channel will appear in the "All Messages" view for Staff Users to review, allowing patient communication to be triaged in real-time. The Patient Channel will also be marked as "Needs Action" in this view. When a user hovers over the Needs Action icon on the Patient's Channel, the message will read "An outgoing message is undelivered."
NOTE: This setting requires users to take action in real-time. We recommend disabling this setting if your organization uses one-way messaging in any other Artera Practices in order to prevent a large volume of open Patient Channels that could accumulate.

Sync Patient Communication Preferences
Artera syncs preference data directly from your EMR to ensure patients receive automated outreach via their chosen method: Text, Phone, or Do Not Contact. To understand how these statuses impact outreach, click here.
Status "On": Syncing is active; EMR preferences are honored.
Status "Off": Syncing is disabled; EMR preferences are not being pulled.
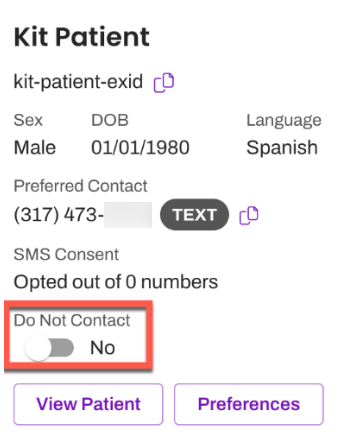
Allow Enterprise Users to Modify Communication Preference to "Do Not Contact"
This setting only displays if Patient Preferences are not being synced from your EMR (see above).
 Enabling this setting adds a Do Not Contact toggle to the Patient Facesheet. Use this to prevent patients from receiving Triggers. You will still be able to contact the patient through Campaigns, Bulk Messages, and manual messages.
NOTE: Only Enterprise Users can view and update the "Do Not Contact" option.
Artera syncs preference data directly from your EMR to ensure patients receive automated outreach via their chosen method: Text, Phone, or Do Not Contact. To understand how these statuses impact outreach, click here.
Status "On": Syncing is active; EMR preferences are honored.
Status "Off": Syncing is disabled; EMR preferences are not being pulled.
Allow Enterprise Users to Modify Communication Preference to "Do Not Contact"
This setting only displays if Patient Preferences are not being synced from your EMR (see above).
Enabling this setting adds a Do Not Contact toggle to the Patient Facesheet. Use this to prevent patients from receiving Triggers. You will still be able to contact the patient through Campaigns, Bulk Messages, and manual messages. NOTE: Only Enterprise Users can view and update the "Do Not Contact" option.
Notify when Text Message is Undeliverable
Enable this setting to show an Event Message in the Patient Channel whenever a message fails to deliver. Click here to learn about undeliverable messages.

Email Communication
Determine whether Artera users can engage with patients manually via email. If users should not send manual emails through Artera, disable this setting.
NOTE: This setting only restricts manual emails to patients via the Patient Channel; it does not affect emails sent via Triggers, Campaigns, or Bulk Messages. We recommend enabling this setting if you plan to use email outreach, as it allows staff to respond back to patients via email.

Display Portal Enrollment Status on Patient Facesheet
Organizations sending portal enrollment data to Artera can enable this setting to view a patient's enrollment status directly on the Patient Facesheet. Click here to learn about Portal Enrollment capabilities.
Referral Statuses to Display on Facesheet
For customers using Artera's Referrals workflow, select the referral statuses that should be displayed on the Patient Facesheet.
NOTE: This can also be dictated at the Practice-level using Practice Settings.
Patient Appointment Status Options
Select which Appointment Statuses the patient can choose from when responding to an appointment reminder. Most commonly, customers allow patients to cancel or confirm their appointments. However, you can also allow patients to choose reschedule, depending on your clinic needs. If you choose Reschedule Appointment, we recommend updating the following settings:
- Update the Customize {eventConfirmText} Smart Phrase Text setting to include R for rescheduling.
- If your integration does not support a Rescheduled status, we recommend adding "Reschedule" to the Actions to Reopen Patient Channel setting.
NOTE: Practices can be configured to offer different Appointment Status options that override the Enterprise configuration of this setting. Click here to learn more about how to update this setting for a Practice.
Allow Patients to Modify Appointment Status
This setting allows patients to alter their previous response to Appointment Confirmation messages that contain the {eventConfirmLink} or {eventConfirmText} Smart Phrases. If enabled, patients who receive a message with the {eventConfirmLink} Smart Phrase will see a “Changed My Mind” link within their confirmation window that allows them to alter their previous response.
NOTE: This does not follow Artera's Leading Practices.
Patients who receive an Appointment Trigger with the {eventConfirmText} Smart Phrase will only be able to alter their previous response if the last outbound message they are responding to contains the {eventConfirmText} Smart Phrase.
For EMRs that do not accept the appointment status of "confirmed", we recommend enabling this setting. When enabled, appointments that are cancelled and later confirmed can be manually updated in the EMR to the correct status.

Display Map of Appointment Location to Patients
This setting is relevant for Enterprises that use the {eventConfirmLink} Smart Phrase in appointment reminders. You can choose to hide or display a Google map of the appointment location on the patient's confirmation page when using the {eventconfirmLink} Smart Phrase in a message.
Show All Patient Appointments
You can disable Events and Resources in Artera to halt associated Triggers. By default, this also hides those appointments from the "Scheduled" view. Enable this setting if you want those appointments to remain visible even when their Event or Resource is disabled.
If enabled, ensure Staff Users are aware that a disabled Resource or Event will not send reminders. As the Patient Facesheet does not show a "Disabled" indicator, users may mistake the lack of automated messages for a system error. 
Customize {eventConfirmText} Smart Phrase Text
Configure the {eventConfirmText} Smart Phrase to match your Enterprise's needs and include translations, as appropriate. You can add "R" for Reschedule if you enabled the Reschedule option within the Patient Appointment Status Options and Actions to Reopen Patient Channel settings.
NOTE: This Smart Phrase can also be customized at the Practice-level through Practice Settings. Customizing this Smart Phrase at the Practice-level would override the Enterprise configuration of this Smart Phrase.
Click here to learn about customizing this Smart Phrase.
Automatic Logout due to Inactivity
Enable this setting to automatically log users out of Artera after a period of idle time (e.g., no cursor movement). Most organizations use a 60-minute timeout, though you can enter a maximum of 35,790 minutes. Some customers may choose to disable this setting if the user's computer automatically locks after an established inactive duration. If you disable the setting, make sure to train your users to log out of Artera when away from their workstations.
NOTE: Regardless of how the setting is saved, all users are logged out of Artera 72 hours after their last login. 
Multifactor Authentication (MFA)
Enabling this setting provides an extra layer of sign-in security that requires Artera users to provide identify verification to access Artera. Click here to learn more. 
Staff Password Expiration
Set the frequency for mandatory Artera password updates. Click here to learn more.
NOTE: The maximum duration is 365 days.
Enterprise-Wide Patient Search and Message
For Enterprises with multiple Practices, this setting enables a global patient search. When enabled, users can find any patient within the Enterprise, regardless of their appointment location. This is ideal for centralized teams such as Financial Services, Scheduling, or Registration.
NOTE: We recommend reviewing this functionality with your compliance department prior to enablement to ensure you are correctly safeguarding any Protected Health Information (PHI).
Campaigns and Call to Text: Enabling this setting allows users to search for Unverified Patients in the Practices that they have access to. This setting must be enabled if you have a Shell Practice designated for Campaigns or unique workflows (i.e. Call to Text & Abandoned Calls). If this setting is not enabled for Campaign-specific Practices, we recommend that you create the Campaign within each Practice to ensure that the patients receiving the message are searchable. This setting does not impact whether the patient can receive a Campaign, only how the Artera user can locate the individual patient. 
Patient Sign-in Security Criteria
To view a Secure Message, patients must verify their identity. Choose which credentials they must provide: Date of Birth, Last 4 Digits of SSN, Zip Code, or a combination of these. Click here for more information. 
Customize Email Logo
Add your organization's logo to customize the emails sent to your patients. To ensure a high-quality display, the logo must have a white or transparent background and be saved in a .png or .jpeg format. This logo can have a maximum size of 300px x 100px.
