Secure and Unsecure Messages
- Get Started
- Troubleshooting and FAQ
- Release Notes
- Patient Channel
- Triggers
- Technical Specifications
- Patient Facesheet
- Insights & Analytics
- Conversation Flows
- Campaigns
- SMS Basics
- Inbox
- Lines & Resources Requests
- Lines, Events, Resources
- Referrals
- AI Agents
- Add-Ons
- Users and Groups
- Platform Settings and Configuration
- Self-Rescheduling
- Recalls
- Artera Harmony Federal Edition
- Marketplace
Table of Contents
Patient ViewUnsecured Messages Secure Messages Secure Message SettingsPatient Sign-in Security (Default Settings)Artera takes the Protected Health Information (PHI) of patients seriously. By default, all messages are configured to send as a secure link. This requires the patient to take an extra step to access the message, ensuring their information remains confidential.
However, you can also send messages as plain, unsecured texts. A good rule of thumb is: if you do not feel comfortable leaving the information on a patient's voicemail, do not send it as an unsecured text message. Sending unsecured messages can create a more seamless patient experience, so they are a great option for general, non-sensitive information. For anything confidential, always stick with the secure message option.
The ability to secure or unsecure messages is available across Artera including manual messages, Bulk Messages, Triggers, Campaigns, and Quick Responses.
NOTE: You can only send secure messages to Verified Patients.
Patient View
Let’s review what the patient sees when receiving a secure or unsecure message:
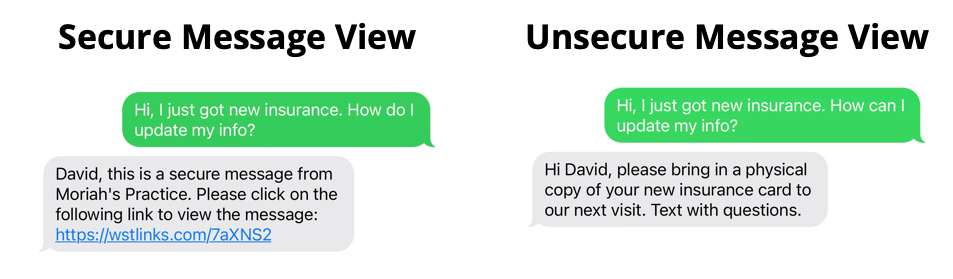
Unsecured Messages
Many messages do not need to be secured because they do not contain PHI. To send an unsecured message, start the message with "!!" (two exclamation marks), no spaces, and begin typing your message. You can also select the Lock icon to "unlock" the message. Any unsecured message will be sent as a plain text to the patient. Plain texts follow the formatting of the texts we receive from friends and family. 
Secure Messages
By default, every message you send through Artera is a secure message. You'll know it's secure because a closed lock icon will appear beneath it.

When a patient receives a secure message, they will get a link sent to their mobile device. This link begins with "http://well.app" and concludes with a random string of numbers or letters. To view the message, they will need to open the link and verify their PHI. The information they must verify depends on what your Enterprise has configured as required within Default Settings.
Secure Message Settings
Patient Sign-in Security (Default Settings)
Enterprise Users can establish whether patients who receive a secure message will need to verify their identity with their:
- Date of Birth
- Last 4 digits of their Social Security Number
- Zip Code
- Date of Birth and Last 4 digits of their Social Security Number
- Date of Birth and Zip Code

Edit Secure Message Copy (Practice or Default Settings)
When a patient receives a secure message, the default message sent is "You've received a secure message [url]".
To edit this message:
- You can make the update for the Practice or Enterprise. Navigate to either Settings > Practice Settings or Settings > Default Settings (Practice Settings will override Default Settings).
-
Edit the message under Customize Secure Message.

- This is important to ensure the patient understands which information is required to view the message. For example, if a recipient does not know whose information is required to unlock the link, they may enter the wrong details, such as a parent entering their own date of birth instead of their child’s. If the patient enters the incorrect information 5 times, they will be locked out of the system.
- Select Save when done.
**Explore More: See how Artera is delivering agentic AI for healthcare to streamline workflows - no programming needed.