Automation Filters
- Get Started
- Release Notes
- Triggers
- Patient Channel
- Troubleshooting and FAQ
- Patient Facesheet
- Technical Specifications
- Insights & Analytics
- Inbox
- Conversation Flows
- Campaigns
- Lines & Resources Requests
- Lines, Events, Resources
- SMS Basics
- Automations
- Referrals
- AI Agents
- Add-Ons
- Users and Groups
- Platform Settings and Configuration
- Self-Rescheduling
- Recalls
- Marketplace
- Artera Harmony Federal Edition
Table of Contents
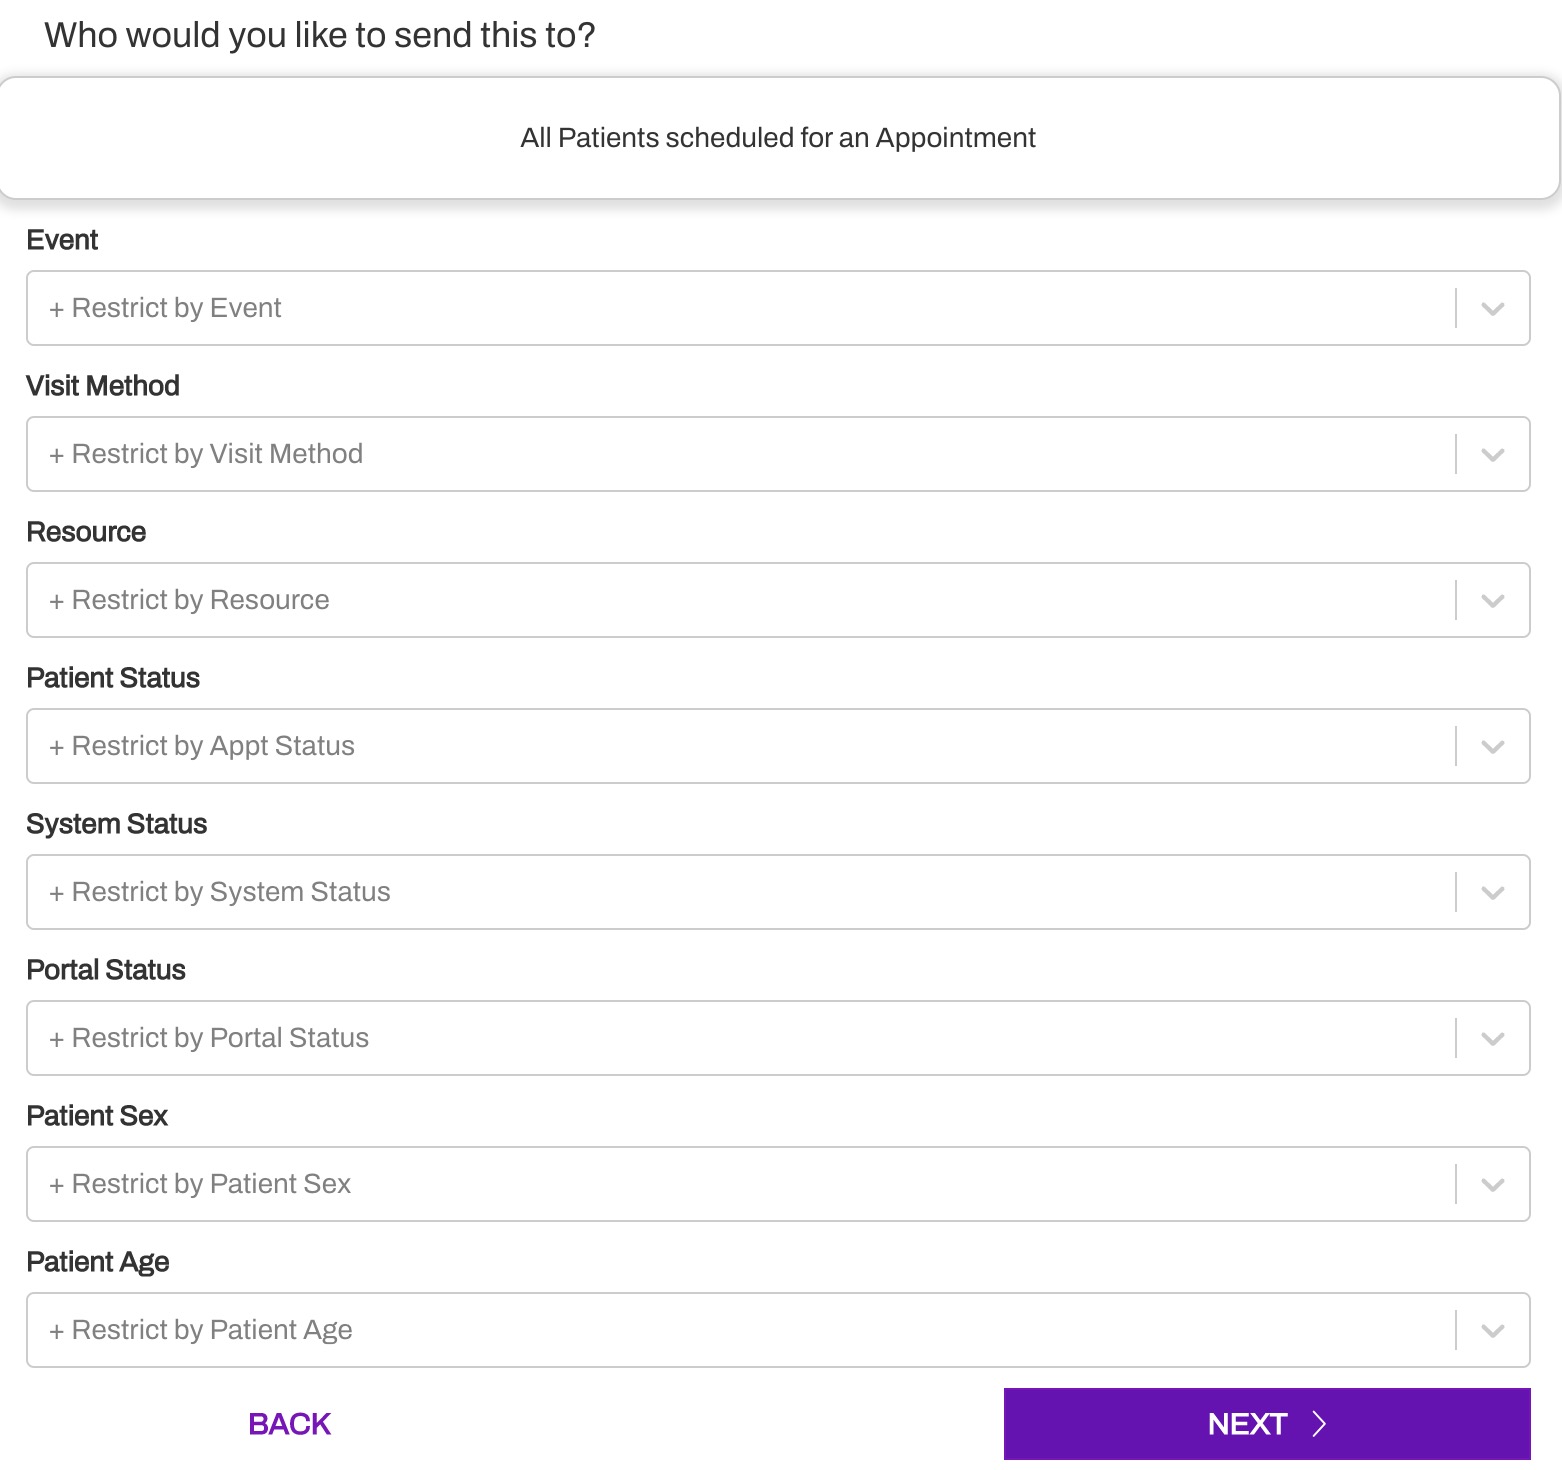
Available FiltersEventAvailable EventsVisit Method (Appointment Only)Patient Status (Appointment Only)System StatusPortal StatusPatient SexPatient AgeFilter LogicRestriction StatementExclusionsMultiple Exclusion LogicExclusions and AutomationsWhen creating and editing Automations, use filters to identify the group of patients that should receive the related automated messaging. In addition to the available filters, there is also logic that allows you to choose whether that filter will include or exclude patients that meet the selected criteria.
For information on building Automations, check out Creating Automated Messages.
Available Filters
It is important to note that the available filters will vary based on the type of Automation module (i.e. Appointment, Recall, etc.) selected. In this table, we have made the distinction between the available Appointment and Recall filters:
Event
The Event filter allows you to select specific Event types from the Events that have been passed from your EMR into your Artera Practice. You can select one or more Events from the drop-down menu. If preferred, you can also click Select All Events at the top of the drop-down and use the X on each Event type you want to remove.
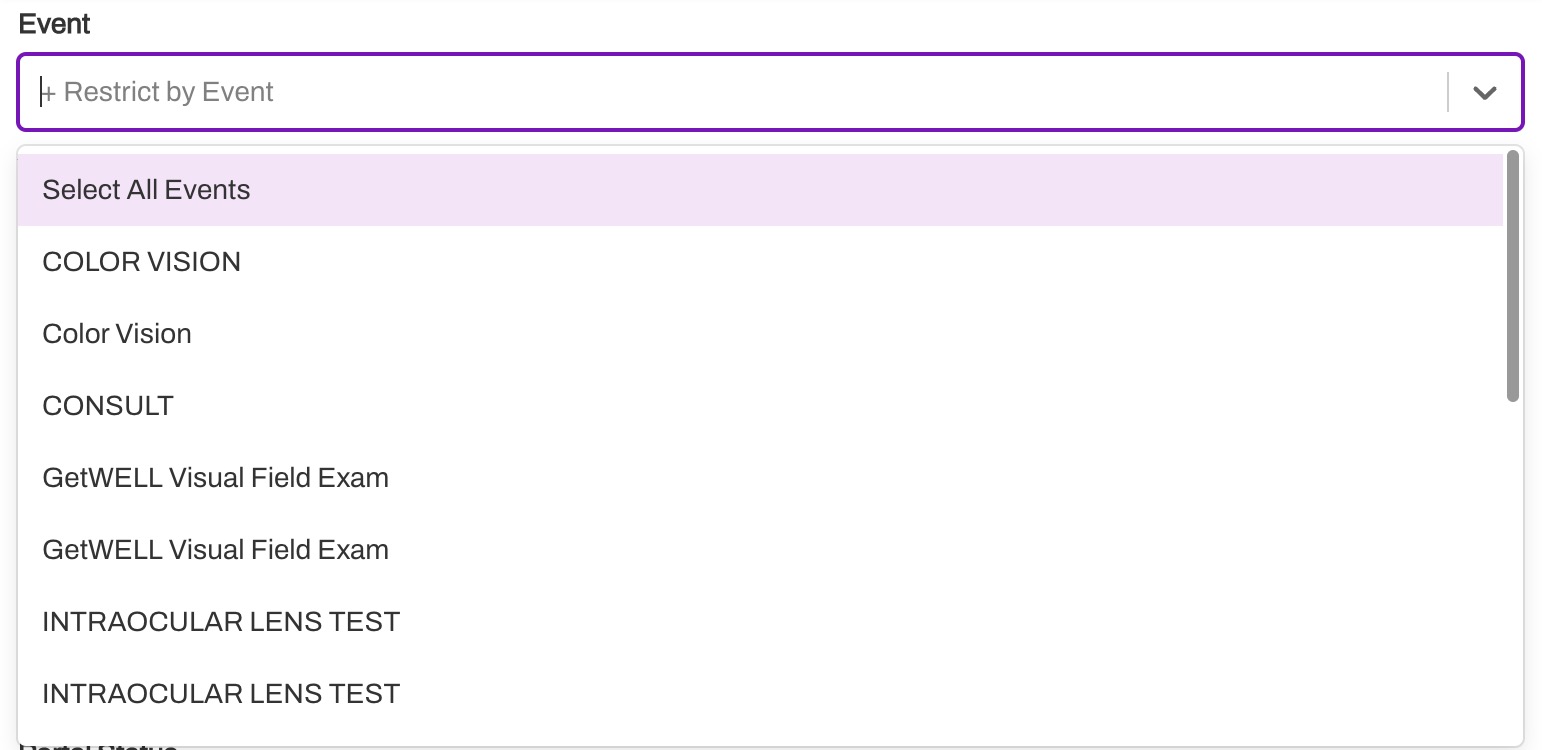
Available Events
To view a full list of events currently in the Practice, navigate to Settings > Practice Settings > Events. Click here to learn more about Events.
Visit Method (Appointment Only)
Visit Methods include In Person, Telehealth, and Video. These Restrictions allow you to another dimension by which to target automated messages. The Visit Modes from your EMR are mapped to these three standard Artera Defaults. These fields will only work if you have implemented Visit Methods by completing the necessary integration work. Click here to learn more. 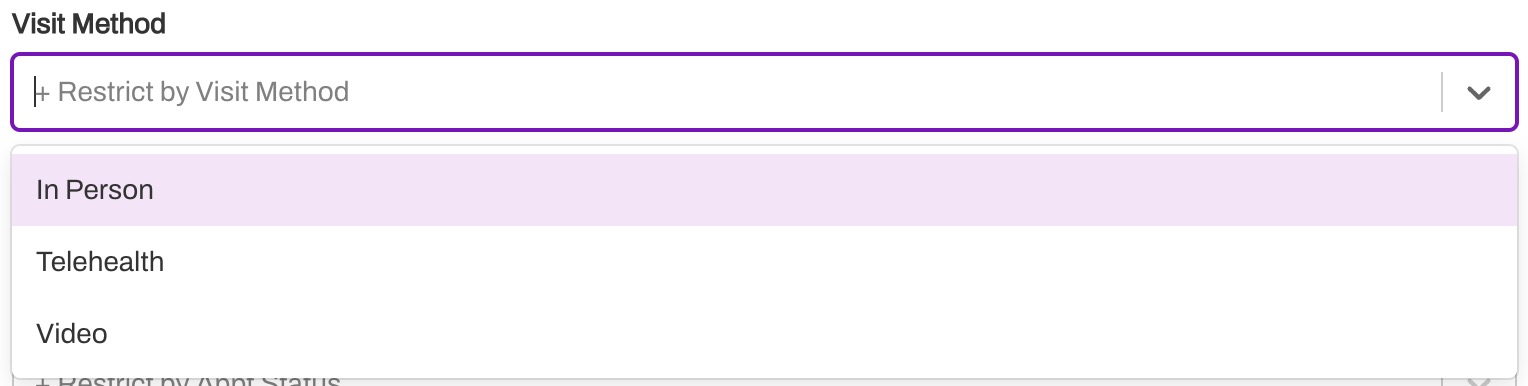
Resource
Resource filters include Providers, Locations, Devices, and other general resources that have been passed from your EMR into your Artera Practice. You can select one or more Resources from the drop-down menu. If preferred, you can also click Select All Resources at the top of the drop-down and use the X on each Resource type you want to remove.
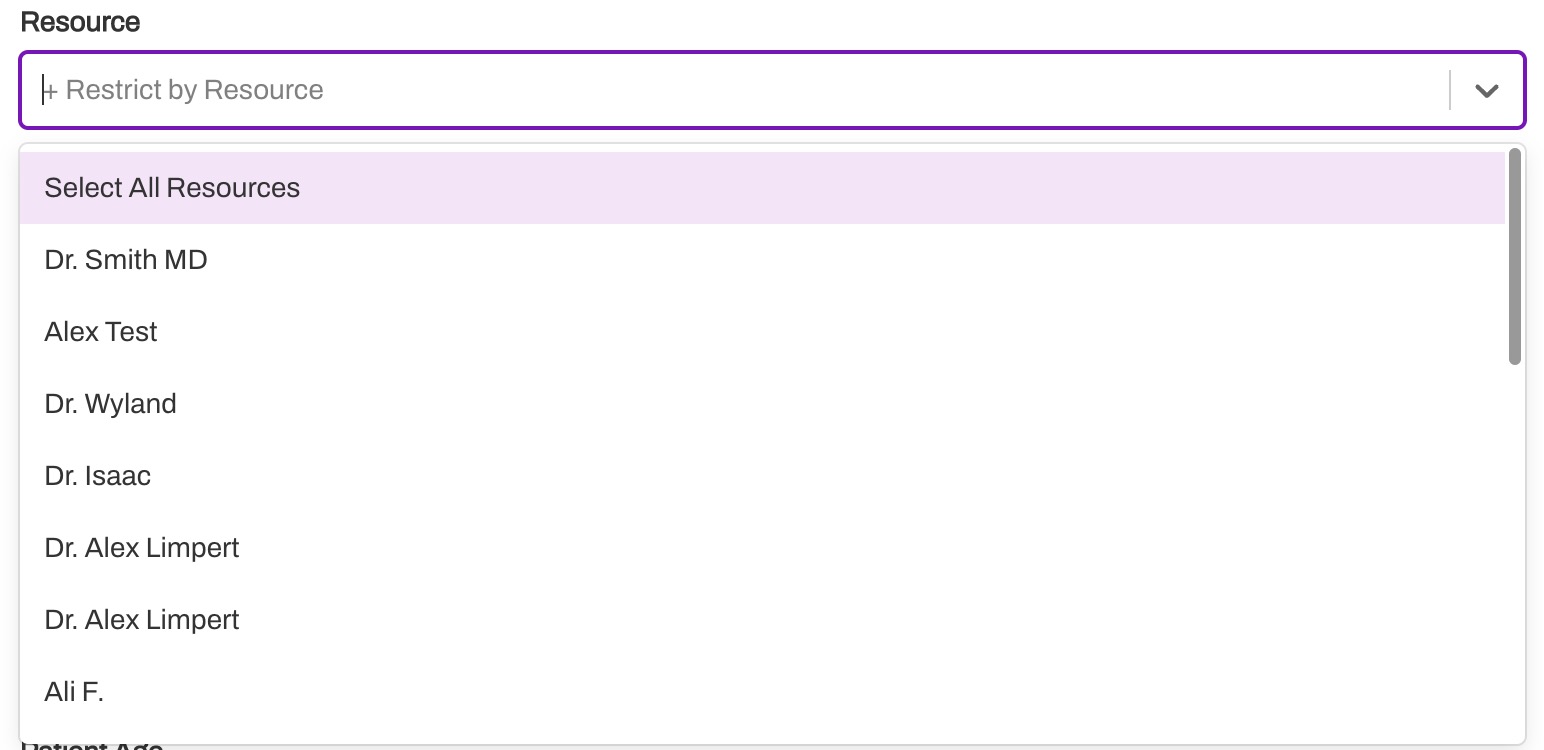
To view a full list of Resources associated with the Practice, navigate to Settings > Practice Settings > Resources. Click here to learn more about Resources.
Patient Status (Appointment Only)
This filter is only available for Appointment Automations. The Patient Status refers to the state of the appointment in relation to how the patient has interacted with your confirmation messages. Multiple Patient Statuses can be selected for an Automation.
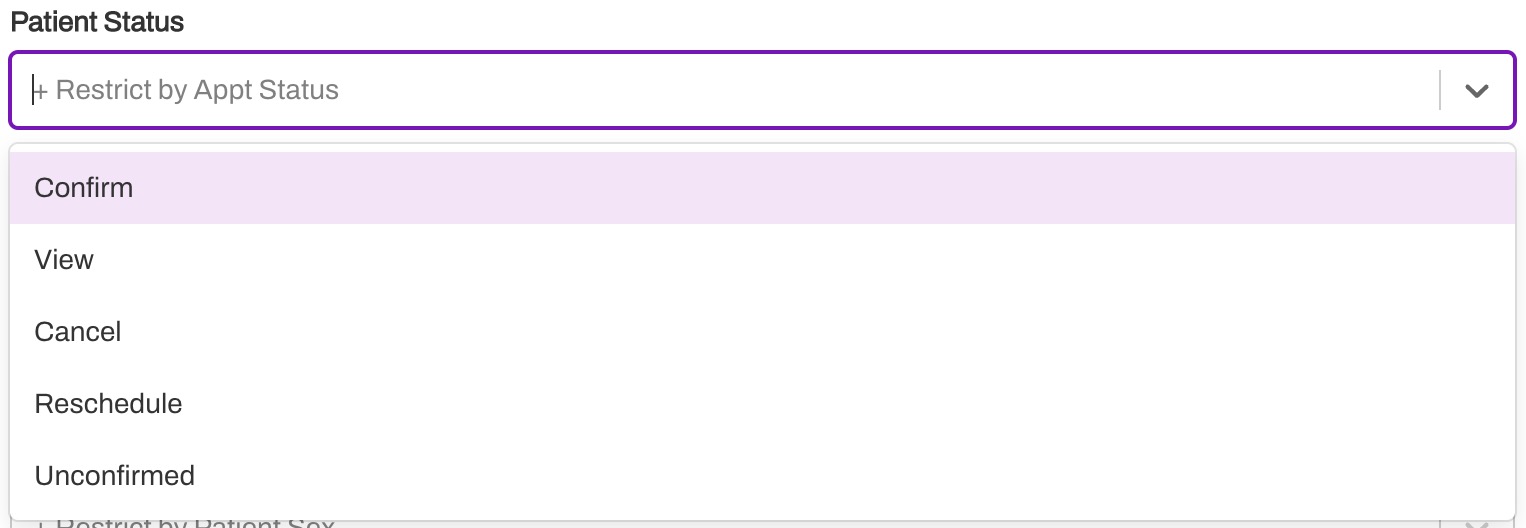
The available filter options are standard to Artera and are mapped to specific values within your EMR. Some Patient Statuses may not be relevant to your integration or particular use case. The Patient Status filter contains the following options:
Confirm: The patient has confirmed that they will attend their appointment either through an Artera Automation or by manual staff update (in Artera).
View: The patient has viewed the content of a confirmation link/message, but has not taken action to confirm or cancel their appointment. This status will only apply if your team is using the {eventConfirmLink} Smart Phrase within your Appointment Reminders rather than the {eventConfirmText} Smart Phrase.
Cancel: The appointment has been requested to be canceled by the patient.
Reschedule: The patient has requested that the appointment be rescheduled to another date/time.
Unconfirmed: The patient has not viewed or taken any action on an Appointment Confirmation Automation. There is no history of engagement in Artera for their upcoming appointment.
System Status
The System Status filter options are standard to Artera and are mapped to specific values within your EMR. Some System Statuses may not be relevant to your integration or supported by your EMR.
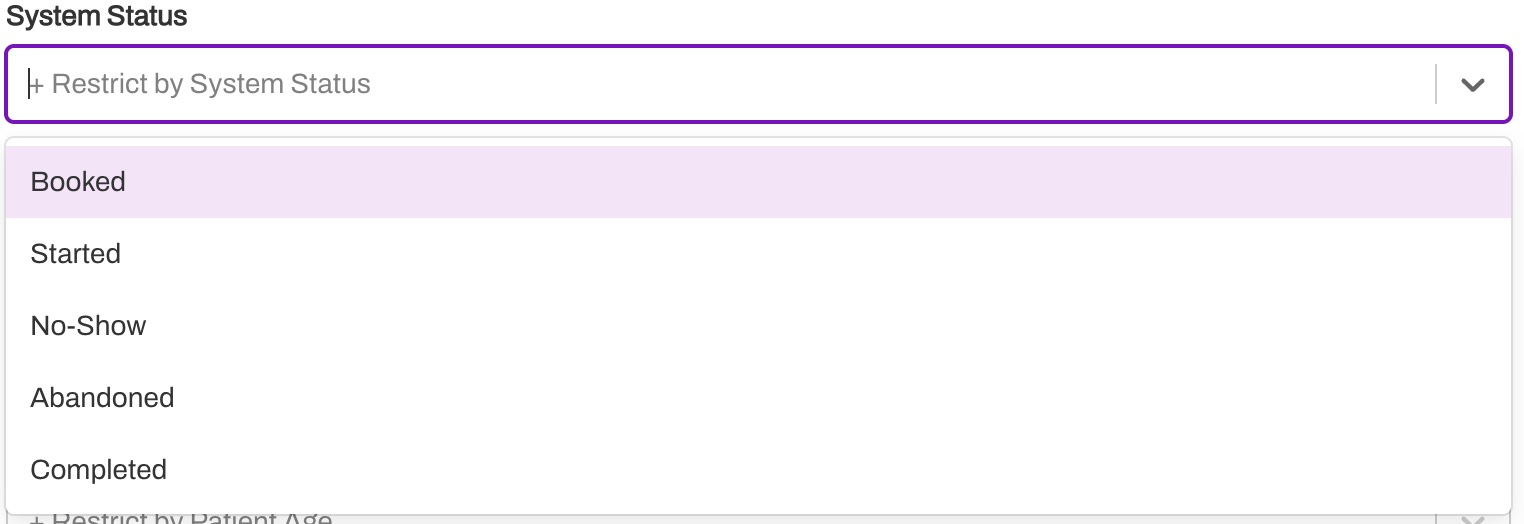
The System Status filter options for Automations depend on the Automation module:
Portal Status
This status refers to whether or not a patient is enrolled in your Patient Portal. Although both Enrolled and Unenrolled can both be selected, it is recommended that you select either one or none of the statuses.

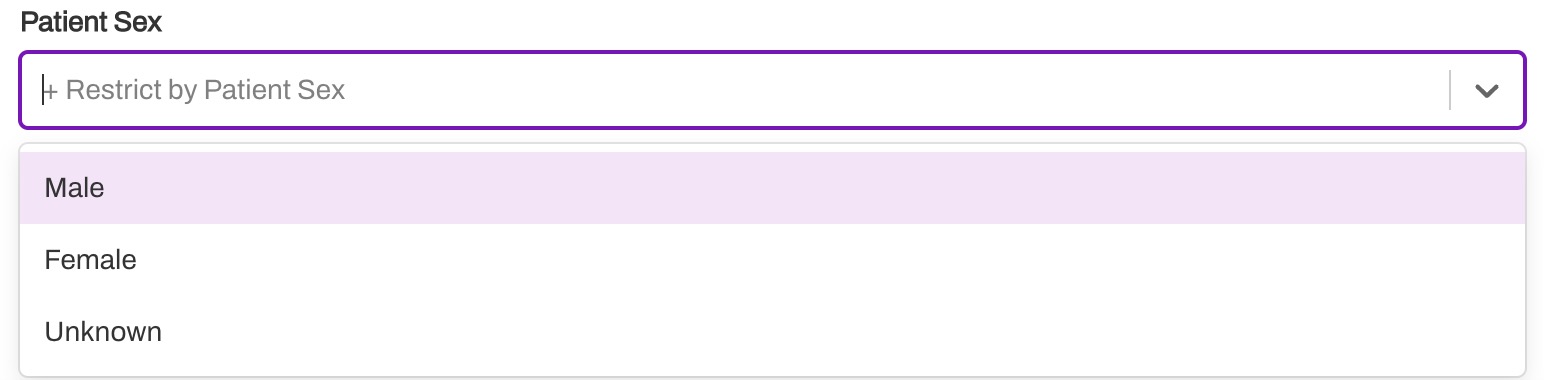
Patient Sex
Unlike the other filters, only one option can be selected for Patient Sex. Options include Male, Female, and Unknown. Unknown represents patients where sex is not included or has been omitted in their record. These default Artera values are mapped to corresponding values in your EMR.
Patient Age
Patient Age filters can either be set to an exact value (is equal to) or a range.
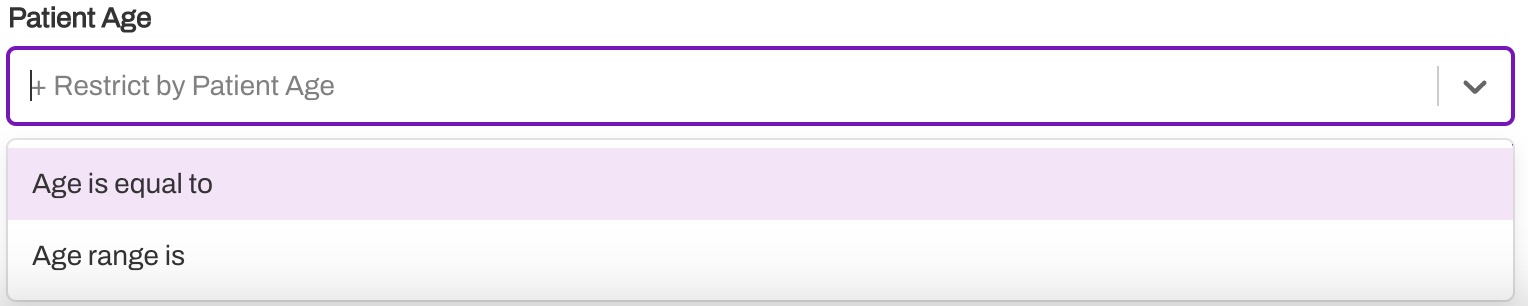
Age ranges are inclusive; a range of 18 to 24 years would include patients aged 18.0 and 24.99 years.

If you wish to create an open-ended range, such as patients over the age of 18, you can create a range with only the beginning value set to 18 years.

Ages can be filtered by months or years. Each can have a maximum of three digits entered into their field; by using months, you can target precise age ranges more accurately than using years.
Filter Logic
The Restriction filters apply default logic. The logic between Restriction sections (i.e. Events and Resources) apply “and” logic. Meaning that the appointment must qualify for both the Event and the Resource restriction in order to receive the message. The logic within Restriction sections (i.e. all Event types selected) apply “or” logic. Meaning that the appointment must be one of the Event types listed in order to receive the message.
In the following example, the patient must be scheduled for an Event Type of Color Vision OR Intraocular Lens Test AND the appointment must be scheduled with the provider Resource of Dr. Smith. 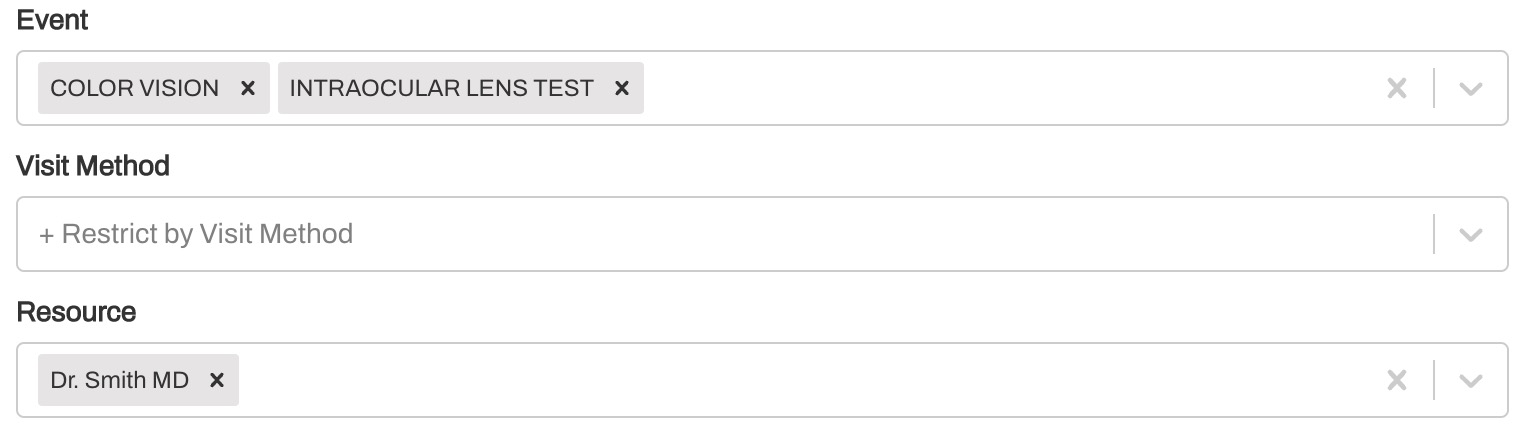
Restriction Statement
The Restriction Statement at the top of the page helps you conceptualize who the Automation will be sent to. The following example shows the recommended configuration for the Appointment Confirmation - 2 Day Unconfirmed Automation. 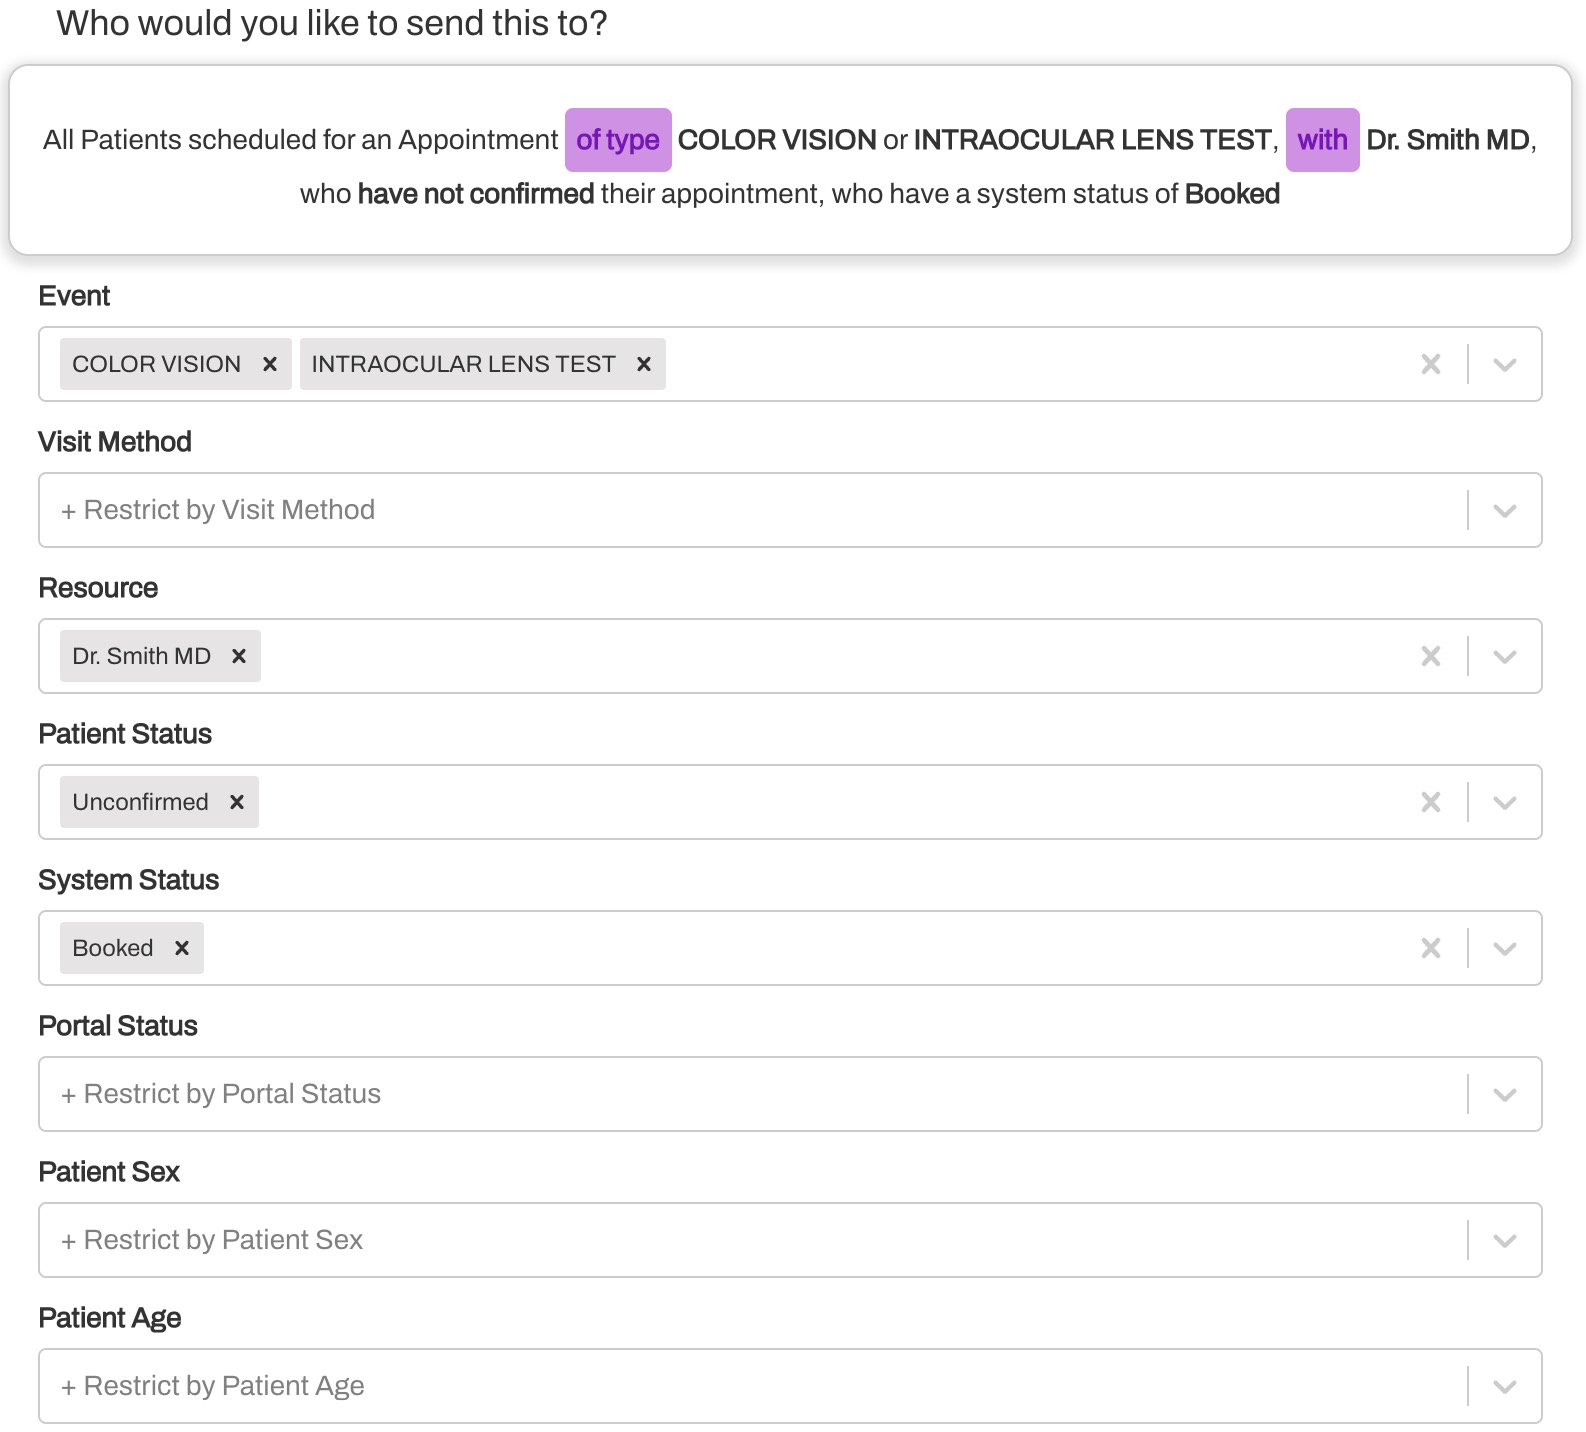
Here, we can see the message is set up to send to “All patients for an appointment of type Color Vision or Intraocular Lens Test with Dr. Smith (provider Resource), who have not confirmed their appointment, and who have a system status of Booked.”
Exclusions
In some instances, it may be easier to exclude the Events or resources that you do not want to send an Automation to than to include all the ones you do. Text within the blue boxes can be clicked on and changes from an inclusive (of type/with) to an exclusive (not of type/not with).
For the following example, we want the Automation to send to all Events except Consults because we have a special confirmation message specific to the Consult Event type. Additionally, we can update the with filter to indicate NOT with if we would like to exclude that specific resource. In this example, that was not relevant to our use case.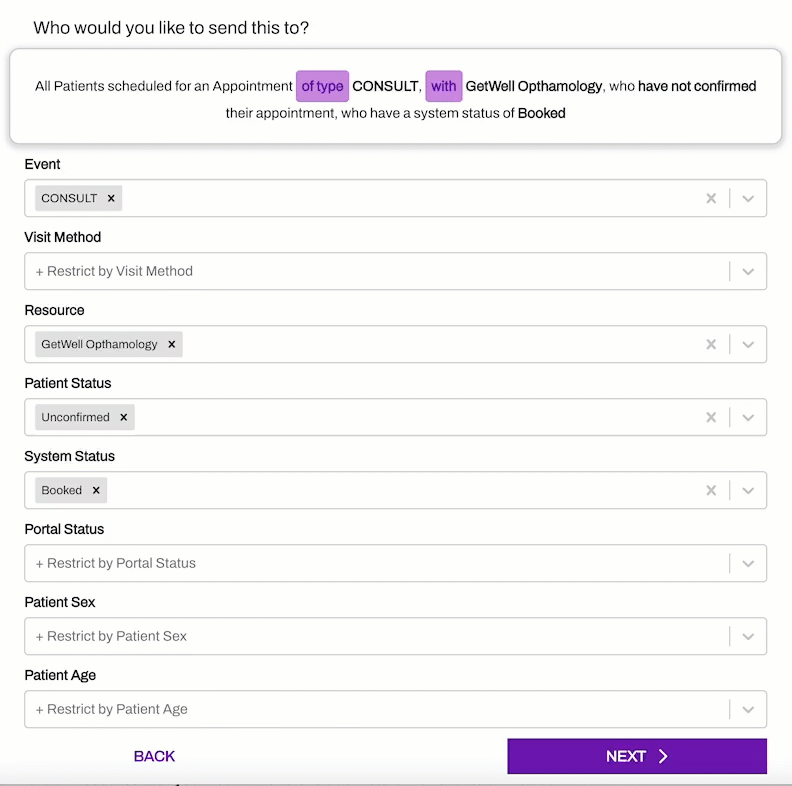
-
Select the Event or Resource that you would like to exclude.
- Click the blue of type and it will become NOT of type (Event)
- Click the blue with and it will become NOT with (Resource)
- Complete other restrictions as needed. The exclusions set above will not apply to any other restriction.
Multiple Exclusion Logic
When adding multiple exclusions, the patient will only need to meet one exclusion criteria to not receive the Automation. In the following example, we have set up the Automation to exclude patients who are scheduled for the Color Vision Event type and exclude those scheduled with the provider of Dr. Smith.

In this example:
If a patient was scheduled for a Color Vision with Dr. Green, the patient would not get this Automation.
If the patient was scheduled for a Telehealth Visit with Dr. Smith, the patient would not get this Automation.
If the patient was scheduled for an Office Visit with Dr. Green, the patient would get this Automation.
Exclusions and Automations
Since multiple exclusion criteria apply OR logic (only one criteria met is needed to exclude a patient from receiving the Automation), it is likely that you will need to create multiple Automations to address a scenario where only a handful of Event types for a specific provider would not need messaging.
In general, if you use exclusion logic for one Automation or set of Automations, you will typically need to create a separate Automation with inclusion logic to reach the other patients you would not be reaching with the exclusion logic Automation(s).
Most Artera customers create an Automation with exclusion logic to provide those patients with different information than the ones who are reached with inclusion logic. The most straightforward example is all patients who have a virtual appointment will need a different set of instructions than patients who attend an In-person appointment like an Office Visit.
In that case, you would create two sets of Automations, one to exclude Virtual Visits and another to include Office Visits.